These wonderful markers are no longer available at this time. Stampin' Up is known for their quality and when something doesn't measure up, they take care of it. Unfortunately, that is the case with the new alcohol markers. We will let you know as soon as the problem is fixed and they are available again. In the mean time, we have so many other products to share. So check out the online shopping to the right and the other Sale-a-bration items you can still earn for FREE!
Here is the print out from Stampin' Up:
Blendabilities Quality Issues
February 27, 2015
We are experiencing a quality issue with our Blendabilities product line. Except for the Tuxedo Black Memento Ink Pad (item #132708) and the Tuxedo Black Memento Ink Pad Refill (item #133456), all item numbers have been turned off; this includes Blendabilities Sale-A-Bration item numbers. At this time, backorders for Blendabilities will not be fulfilled.
We thank you for your patience and will update you as soon as we have more information.
Have a great day and thanks for stopping by!
Saturday, February 28, 2015
Friday, February 27, 2015
Weekend Challenge

I pulled out some of my retired items to create this card for a "weekend challenge" which you can check out on Connie Stewart's blog HERE. How do you think I did? Would love to know what you think.
We are having a wild and blustery winter day, so needed something to remind me of spring!
The card base is Old Olive with the flowers mounted on dimensionals and placed on a mat of Basic Black. They are then placed on a strip from the Adventure Bound DSP stack (137780). Using the Dotted Scallop Ribbon Border punch (119275), a strip is placed under the image, adding buttons with glue dots and stamping my sentiment with Momento Black ink (132708). The images are colored with Blendabilities (which can be earned as FREE gifts with Sale-a-bration ).
Hope you are having a warm and creative day. Thanks for stopping by!
Monday, February 23, 2015
Corner Floral

I actually saw a stamp online that inspired me to try this look with product that I have on hand.
The cardbase is Island Indigo. The Whisper White mat is stamped with the Dictionary Background stamp (w-130348 or c-130351), using the Momento Black ink pad (132708). With the background stamps, I inked the stamp and placed the cardstock on top of the inked images carefully, lay a piece of scrap paper on top and rub the image with my fingers, then carefully pull the stamped image away from the stamp.
Using the same ink, stamp the images from the Hostess set, Bloom With Hope (w-133949 or c-133952). I actually used the paper covering on my clear set as masks to stamp the smaller flowers and leaves over the other images. Let these images dry for just a bit, then use the Coastal Cabana (131000), light Pumpkin Pie (130997) and the Old Olive Blendabilities (130999) to color the images.
EARN THE BLENDABILITIES for FREE with our Sale-a-brations promotion, going on til March 31, 2015. Check out the details at my online shopping by clicking on the button in the right hand column.
On Whisper White, stamp an image from Papillion Potpourri (w-132058 or c-123759) with Island Indigo ink. Use the small Aqua Painter (103954) to pull some of the outline ink towards the center. This will add a hint of color to the wings. Stamp the image from Perfect Pennants (w-133227 or c-133230) with Island Indigo ink. Use the Banners Framelits (132173) or your Paper Snips (103579) to cut the images out. Add them to the cover with dimensionals, bending up the butterfly wings just a bit.
I hope you are inspired to give this a try with product that you might already own or order what you need at my online store to get the free gifts with sale-a-bration. If you have any questions or comments, don't hesitate to contact me. I would love to hear from you!
Have a great day and thank you so much for stopping by!
Saturday, February 21, 2015
Pacific Blue Floral
Hi, everyone! We are having a lovely snow right now, but sounds like it might get interesting. Luckily, I get to stay in and enjoy the beautiful scenery outside my window and do what I enjoy so much, crafting. I hope that you will be inspired to create, too.

This is the card I created, closed.

This is the card opened. I will write or stamp a sentiment in the white area later.

This is a close up of the inside panel.

Here is a hint for placement. (Notice the messy background......my scratch paper while working on a project.) Position your pieces and once they are where you like them, take a picture. Then if you forget or are interrupted, you can look at the picture to fasten them down the way you wanted them.
Now on to the specifics of this project :)....
Cut a Whisper White at 4 1/4" x 11", scoring at 2 3/4" and 5 1/2". Do not fold these yet, as it is easier to decorate before folding.
From Pacific Point, cut two pieces at 1" x 4 3/8". Tape these down to each end. Punch out the butterflies with the Bitty Butterfly punch (129406). Lightly sponge Pacific Point around each butterfly and glue them to the 1" strips on each end. On the right side set, color some of the Basic Jewels Rhinestones (119246) with the dark Coastal Cabana Blendabilities Marker (131000) and place one on each butterfly. On the left side, place a single small Pearls Basic Jewels (119247).
From Pacific Point again, cut a 1 1/2" x 4 1/8" and a 4 1/8" x 4 1/8". Place the smaller one on the far left panel next to the butterfly strip and the larger one on the last panel, lined up with the fold, top and bottom. Color a strip and a half of the pearls and position them down the center, between the two strips of Pacific Point on the last panel.
With Whisper White, cut a 1 3/8" x4" and a 4" square. Emboss the smaller piece with the Delicate Designs Embossing Folder (127023) and the larger one with the Fancy Fan Embossing Folder (127751). NOTE: since Whisper White is a lighter weight cardstock, you may want to add a piece of wax paper in the folder with it, to prevent tearing. Use the Sticky Strip (104294) to attach these pieces to the left and right panels of Pacific Point. (these pieces are fragile after embossing, so take care in adding adhesive.) Color four small pearls and add them to the center points of the design in the small piece of embossing.
Now for the floral design.....Use the Stippled Blossoms stamp set (w-132076 or c-126747), stamp out two of the large flower designs with Pacific Point and three of the smaller flowers with Daffodil Delight. (REMEMBER: this is a two step stamp set, so ink the solid image and stamp off on to scrap paper first, then use the detail stamp fully inked on top to that image.) For the larger leaves use Old Olive and the smaller ones, use Always Artichoke. (I actually stamped off the Always Artichoke twice for the solid and once for the detail). With the Papillion Potpourri stamp set (w-132058 or c-123759), stamp out three of the butterflies in Pacific Point, then using a light touch, use the small Aqua Painter (103954) to pull some of the color from the outline into the wings. Cut all the pieces out with the Paper Snips (103579). It is okay to leave a bit of white as you cut. It really isn't necessary to be precise when cutting these out.
Now position all these pieces til it is pleasing to you. Then attach them, using dimensionals (104430) on some of them to add to the appeal.
Stamp or write your sentiment(s) in the white space between the decorated panels and fold, using a Bone Folder (102300) to create a crisp fold, mountain fold on the first score and valley fold on the second score.
Remember, you can change out the colors and embellishments to please yourself or the recipient. Just have fun with it!
Have a great day and thanks so much for stopping by!!
Friday, February 20, 2015
White on White
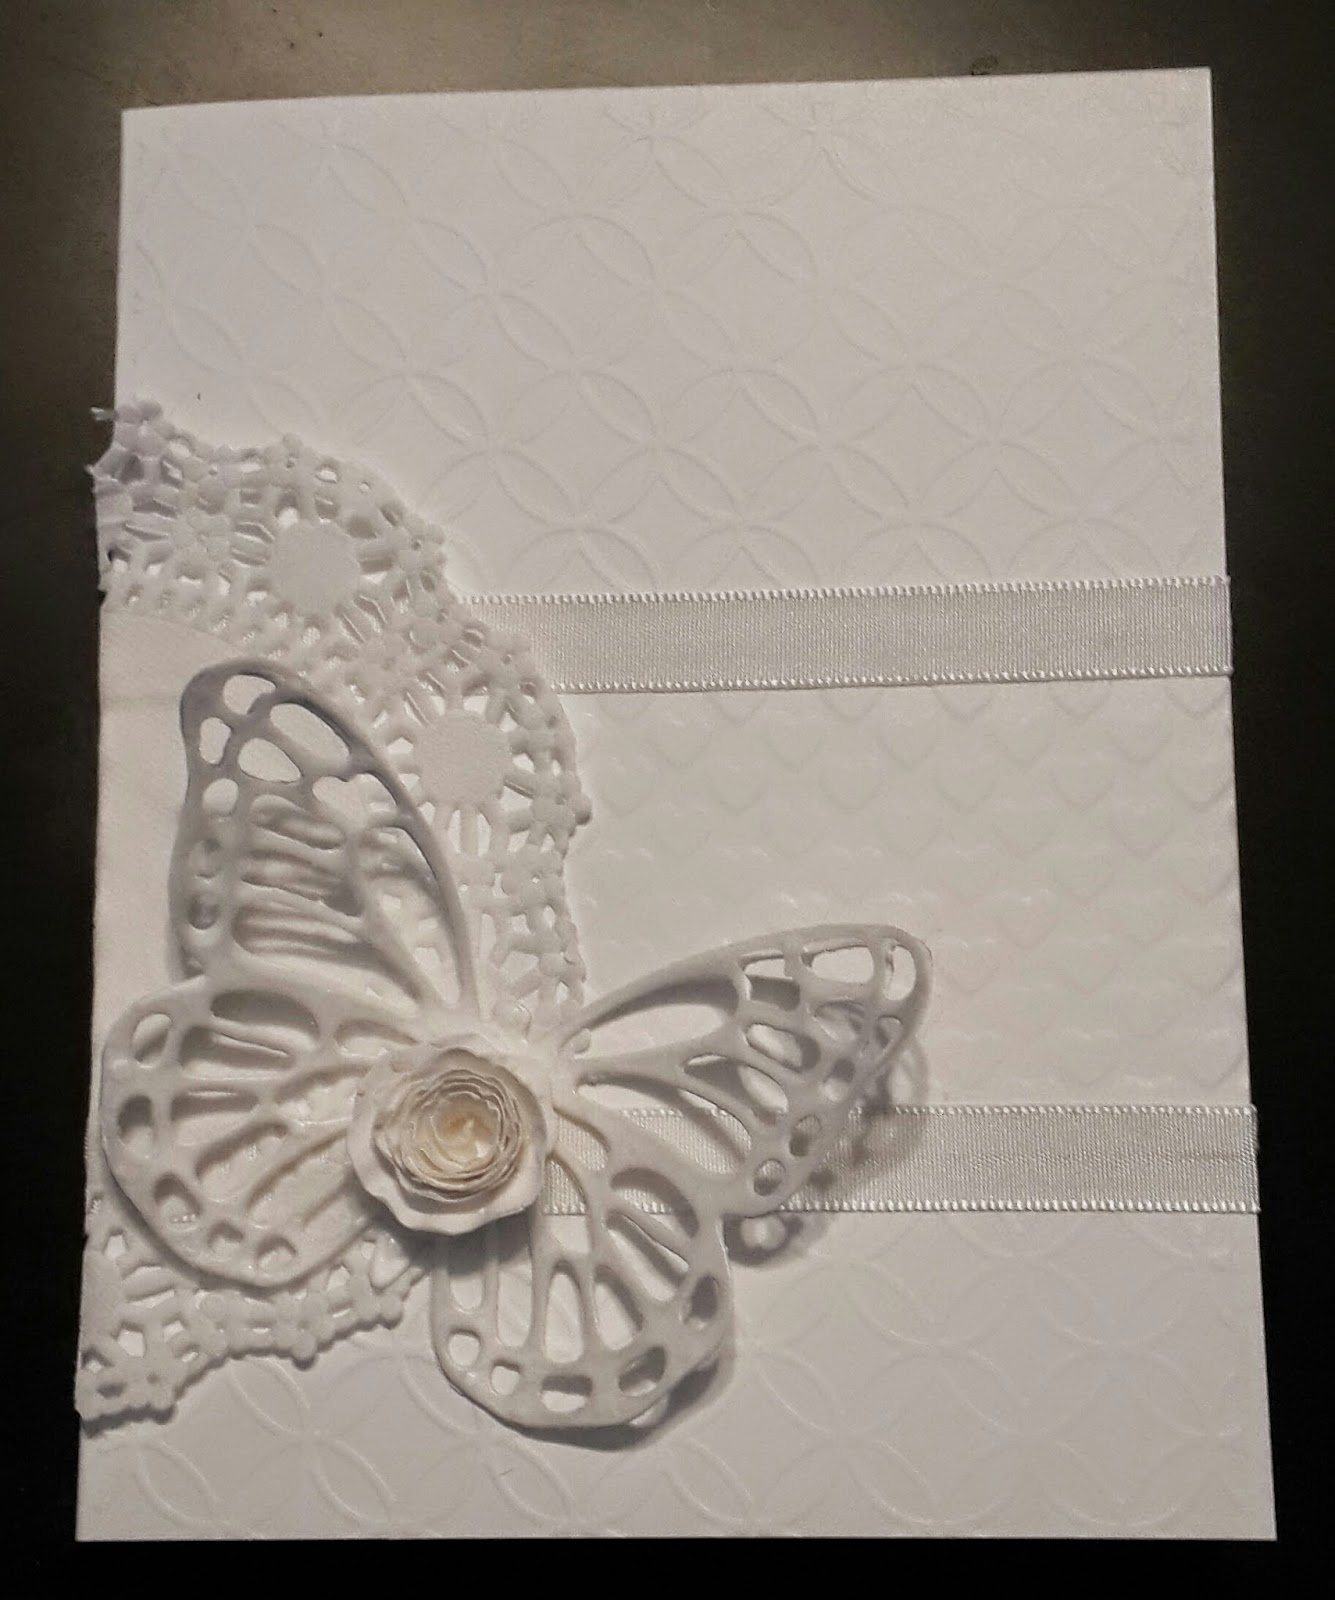
I love the look of white on white, whether it is shimmer white or flat, there is something soothing and elegant about it. I have left the sentiment for the inside of this card, thinking it could be used for a wedding, anniversary, or even a sympathy card.
I embossed the front of the card and with a different folded embossed a piece measuring 1 1/2" x 4 1/4", taping whisper white satin ribbon (134549_ over the seams. Cut a doily (129399) in half and glue to the card.
With the Butterfly Thinlits (LOVE these! #137360), cut out the middle one and attach it to the card. (If you add wax paper between the die and cardstock, it will come out easier.) Add the wax paper image to the top of the cardstock butterfly. I think it really adds to the reality of the butterfly. (With or without the wax paper, use folded up dryer sheet on top of the cardstock before cutting. The die cut will stick to the dryer sheet and you can peel it off carefully, leaving all those little cutouts on the dryer sheet.)
Punch out a 1 3/4" scalloped circle (119854). Using the paper snips (103579) cut a wavy spiral, about 1/4" wide, starting from the outside working to the inside. Roll from the outside to the inside onto a Quilling tool, scoring tool, toothpick, or something similar. Glue the end to the flower to hold the shape and glue to the center of the butterfly body.
Hope you have a great day and thank you so much for stopping by!
Thursday, February 19, 2015
Kinda Eclectic Sunshine

I know winter is still with a lot of us, so decided we needed a little sunshine. I actually created this one for a friend recovering from surgery.
The card base is So Saffron sponged with Daffodil Delight, Pumpkin Pie and Old Olive. I used the stamp from Kinda Eclectic (w-135347 or c-135350) with Pumpkin Pie (stamped off on scrap paper first) to create a background print. I created an envelope out of So Saffron, also sponged with the same inks, placing a brad from the inside to create the look of a clasp. The flowers (from retired Eastern Blooms) are also stamped on So Saffron with the same ink and cut out before placing on the card. I used a dauber and Sahara Sand to color the centers. Attach your sentiment with a little adhesive and a mini clip (available in Basics Hodgepodge Clips -133765)
Hope this one makes you smile.
Have a great day and thanks for stopping by!
Tuesday, February 17, 2015
Single Layer Magnolia Tree

Spring will come!!!!
This is basically a single layer card (except for the flowers and ribbon). The card base is Pool Party
(4 1/4 x 11 with top fold) with Pool Party sponged on the upper 2/3 of the card for the sky. Using the Sheltering Tree stamp set (137163), stamp the tree with Sahara Sand, then stamp the leaves with Old Olive then Rose Red. Using the brush stroke stamp and Old Olive, stamp the ground cover, stamping twice with each inking. Then add spots of the grass stems. The flowers are from the punch set, Itty Bitty Accents (133787) and Whisper White. Lightly sponge them with Rose Red, then place them on the piercing mat (126199) and using the scoring stylus (125624) (or the one with your score board), press down in the center of the flower to give them dimension. Glue to the tree and add a Daffodil Delight spot of ink to the centers. The background tree is from the Thoughts and Prayers stamp set (w-128751 or c-127805). Ink it with Sahara Sand, stamping off once in a scrap piece then stamping the lighter image onto the card. (You could do the same with the same tree stamp that we used for the main image.) Stamp your sentiment with Pool Party across the top of the card. Wrap and tie ribbon across the bottom of the card. (You can leave it loose or tack it down with glue dots.)
DON'T forget that Sale-a-bration is still going on! Check out the details at my online store by clicking on the button in the right side column.
Have a great day and thanks so much for stopping by!
Monday, February 16, 2015
Kinda Eclectic St. Patty

Okay, so Valentine's is over and it is time to start on the next phase.....
The base of this card is Wild Wasabi, matted with a piece cut from the Back to Basic DSP (13370). I sponged Wild Wasabi around the mat, stamped the leaves from the set Kinda Eclectic (w-135347 or c-135350) with Wild Wasabi ink. I added color for flowers with the small stamp in Sheltering Tree (137163)(LOVE THIS SET!!! SO versatile!), using Wild Wasabi, Daffodil Delight, and Pumpkin Pie.
For the butterfly, spray the watercolor paper (122959) with water and brush Daffodil Delight and Pumpkin pie across it. Let dry, or dry with heat tool (129053). Using the wonderful Butterfly thinlits (137360), cut the middle shape from Wild Wasabi, using the wax paper and dryer sheet method. Glue the butterfly on the watercolor paper for the best coloring and cut out. Glue the wax paper image on top of the image to soften the color. This also makes it look more delicate. Add Dazzeling Details (124117) to the butterfly cut outs. Add glue to the body and attach to the card.
The sentiment is from Teeny Tiny Wishes (w-128748 or c-127802). What would we do without this set?! Stamp it on Whisper White and punch out with the Word Window Punch (119857). Punch out a Large Oval (119855) from Wild Wasabi cardstock. Sponge around both pieces with Wild Wasabi. Mont the phrase to the center of the oval and add brads from the Subtles Candy Dot Collection (130933). Add dimensionals to the back of the piece and attach to the card.
That is all there is to it!! Hope you enjoyed this and thanks so much for stopping by!
Have a great day!
Saturday, February 14, 2015
Quilted Hearts and Flowers


Happy Valentine's Day to everyone! I know this is a birthday card, but wanted to wish you all a great and loving day.
This card has a couple of different techniques that I just had to try and share. It is hard to tell in the top photo, but the hearts are actually two different sides of the DSP. I put it all together, then ran it through the Honeycomb embossing folder (129378) to give it a quilted look.
Here is the video that shows how to do the image:
https://www.youtube.com/watch?v=tFfbpgKy21M&list=UUwhQRmsAA4vRV1Ykaorpq8g&index=4
And here is the video for the floral bouquet on the inside of the card:
https://www.youtube.com/watch?v=QkJnfmGtT-I
I used glue dots instead of dimensionals because I preferred less space between the flowers. Don't attach it too closely to the center of the card or they won't open correctly. I also stamped some greenery on green cardstock and cut them out to add to the bouquet. I just glued them down to the card base.
Let me know if you have any questions and thanks so much for stopping by!
Wednesday, February 11, 2015
CAS Valentine

Not only is this a clean and simple card, but I cased it from one I saw on pinterest. If you haven't checked out that site, you are really missing out. I must warn you, though, don't go there expecting to do a brief check. It won't work......
On to the card.... This has a Whisper White base, using Gold as a mat and the Stacked With Love Paper Stack (137779) from the Occasions catalog. Great papers for Valentine's, then the backs are all black and white designs for other uses. I punched out a gold and Real Red heart, wrapped the gold ribbon (134583) around the flag and tied a piece through the button. The sentiment is from Teeny Tiny Wishes (w-128748 or c-127802), which is truly one of my "go to" sentiment sets.
Hope you like it and will give this one a try. Valentine's will be here soon.
Have a really great day and thanks so much for stopping by!
Saturday, February 7, 2015
More Butterflies


I absolutely LOVE the new Butterfly thinlits (137360) in the new Occasions catalog! This card uses all three! It also has a corresponding stamp set (Butterfly Basics, wood-138813, clear-138816, or photopolymer-137154). These are also sold in a bundle for a 15% savings, PLUS if you are purchasing the wood or clear bundles, you qualify for a free gift from the Sale-a-bration selection! Even the photopolymer bundle puts you very close.
For this card, I used a Daffodil Delight card base (8 1/2" x 5 1/2" scored at 4 1/4"). Cover the front with a mat from the Moonlight Designer Series Paper (133701), then using the larger butterfly die, cut from the cover (the die cut can be used for another project). It is also cut from Basic Black cardstock, then covered with a layer of Crystal Effects (101055). With a piece of Watercolor paper (122959), dampen it down with water, then brush small amounts of ink onto it. Once the large butterfly is dry, place it on an adhesive sheet (133722), then onto the dry colored paper and cut it out. Close the card and glue the butterfly to the inside of the card through the opening made earlier. Cut the middle sized butterfly out of Calypso Coral and the solid one out of Daffodil Delight, stacking them on top of the larger one. Add three small Rhinestone Basic Jewels (119246) to the body of the solid cut out.
All of the products used on this card can be purchased by clicking the online shopping button to the right. Let me know if you have any questions and thank you so much for stopping by.
Have a GREAT day!!!
Friday, February 6, 2015
co-worker Valentines

This wonderful gift/card idea came from a fellow demonstrator, Connie Stewart. The ribbon is actually holding in three of the Hershey nugget candies.
Create the base with 3"x 7 1/2" Pink Pirouette cardstock, scored at 1 3/8", 1 7/8", 3 1/4", and 3 3/4".
I stamped light images all over the base and sponged around the edges. Then fold on the scores and place adhesive on the back of the first fold (1 3/8"). Fold this around so the edge is up against the last score line. This will form the "box" to hold the chocolates. Place the chocolates inside and wrap with ribbon. Choose your favorite way to tie off the ribbon on top to hold the chocolates in. I slipped a pony bead over the ends, but you could tie it with a bow, wrap twine and/or linen thread around it, or any other way that you would choose. Decorate as desired.
I actually used a retired stamp and die for the hearts. The glitter hearts are from the Itty Bitty Accents Punch Pack 133787) and the smallest thinlit from the Hearts Collection (125599). They are both cut from the silver Glimmer Paper (135314). The sentiment is from the Teeny Tiny Wishes Stamp Set (wood-128748 or clear-127802).
These items and so much more fun stuff can be ordered at my online store. Just click on the button to the right for all the available products!
Hope you enjoyed this and give it a try. It is another fast and easy project, which is always one of my favorites! Have a great day and thanks so much for stopping by!
Thursday, February 5, 2015
First Grade Valentine Favor


This one just makes me smile! Hopefully it will do the same thing for the first grade class that will receive it. AND it is so simple to create. They are simply sleeves for the Conversation Hearts.
Here are the supplies that I used:
Cardstock: Real Red
Whisper White
Smokey Slate
Stacked With Love Designer Series Paper Stack (137779)
Inks: Real Red
Momento Black
Stamp sets: Kind Koala (134360)
That's the Ticket (wood-131946 or clear-128075)
Punches and dies: Heart thinlits (125599)
Tickets Duo Builder (126883)
And here is how I made it:
Cut the real red cardstock to 6 1/8"x 3 1/2", scored at 7/8", 2 5/8", 3 1/2", and 5 1/4". Place double stick tape on one of the 7/8" ends. Wrap this around the box of candy and seal. This will insure a good fit for the box. Cut a piece of designer series paper at 1 5/8"x 3 7/8". Adhere this to the front of the sleeve. Cut out a small heart from the thinlits (or how ever many you need). You can leave them as they are, or I ran mine through my tiny hearts embossing folder (retired). Ink up the Koala, only, and stamp on the Smokey Slate, cutting it out. Tape/glue the body to the DSP and add the heart under the top paws and over the bottom paws. With Real Red, stamp the sentiment on whisper white and punch it out with the ticket punch. Mount this onto real red, 1 5/8"x 7/8". Use dimensionals to add it to the top of the DSP. I added Crystal Effects to the muzzle and black glitter glue to the eyes. And that is it!!!
Hope you have a great day and thanks so much for stopping by!!!
Monday, February 2, 2015
Concertina fold


This was a fun card to make. Here is a list of the products I used to create it:
Cardstock: Blackberry Bliss
Naturals White
So Saffron
Inks: Blackberry Bliss
Hello Honey
Sahara Sand
Moonlight Designer Series Paper Stack (133701)
Stamp Sets: Kinda Eclectic (wood-135347, clear-135350)
Happy Harmony (retired)
Beautiful Wings thinlit (118138)
Click on the SU Online Ordering button to the right to purchase your supplies. AND receive FREE product with qualifying order!
The base of the card is created with Blackberry Bliss, 10"x 3 1/2", scored at 5".
Stamp on the Naturals White with the Kinda Eclectic stamp set. (4 1/4"x 2 3/4") matted with Blackberry Bliss (4 3/8" x 2 7/8"), So Saffron (4 5/8" x 3 1/8"), Naturals White (4 3/4" x 3 1/4"). Place this on the front cover and embellish butterflies, cut from the thinlit die. Stamp the sentiment in Blackberry Bliss on Naturals White, matted with Blackberry Bliss and attached to the cover with dimensionals (104430). Don't forget to add a small butterfly to this piece, too.
For the inside fun, you will need a piece of Blackberry Bliss cardstock cut at 11" x 4 1/2", scored at
2 1/2", 5", and 7 1/2". Cut the top 1" of each panel to create a tag top (If you have the tag topper punch, this works great! I used a retired corner punch on my example, and cut away the excess). On the first and third panels, mat a piece of the dsp (2 3/8"x 3 1/4") with So Saffron (2 1/4"x 3 3/8"). Use the same measurements to place Naturals White, stamped and matted with So Saffron. Glue or tape the first and last panels to the card base. Add ribbon to your tag tops and that is it!
NOTE: You could add 1/2" to each end of the inside to attach the card for more flare AND/OR decorate the inside of the base card with dsp.
I hope you enjoyed this project and will give it a try!
Have a great day and thanks so much for stopping by!
Subscribe to:
Posts (Atom)